01Account Registration and Login
Rooftop Hub runs in a web browser. Google Chrome is the recommended browser.
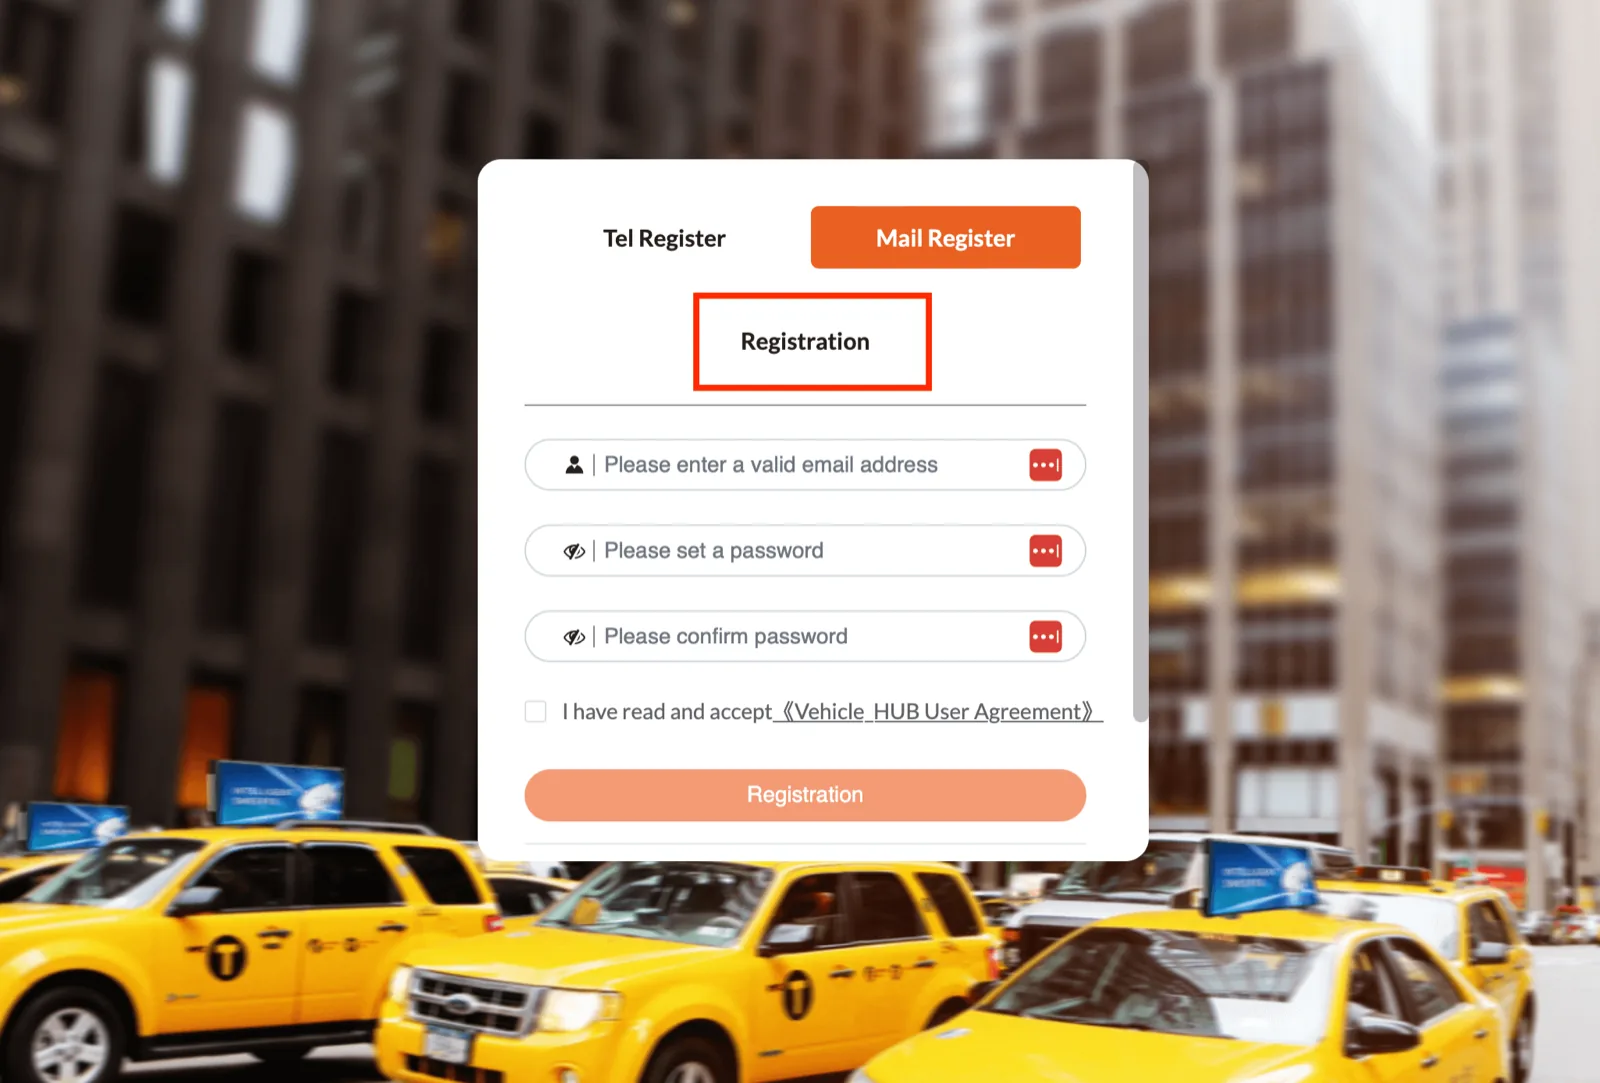
Registration is self-service: you create the account yourself. There is no business-details form, no manual approval step, no waiting period, and no credentials mailed to you.
Create an account
- Open vehhub.top.
- Click Create an Account.
- Enter a valid email address. This is also your username.
- Set the password and confirm it.
- Accept the user agreement.
- Click Create an Account.
Log in
- Enter your username (your email) and your password.
- Click Please click the button to verify. Wait for Verify Success.
- Click Get verification code.
- Open your email, read the code, and enter it.
- Click Log In.
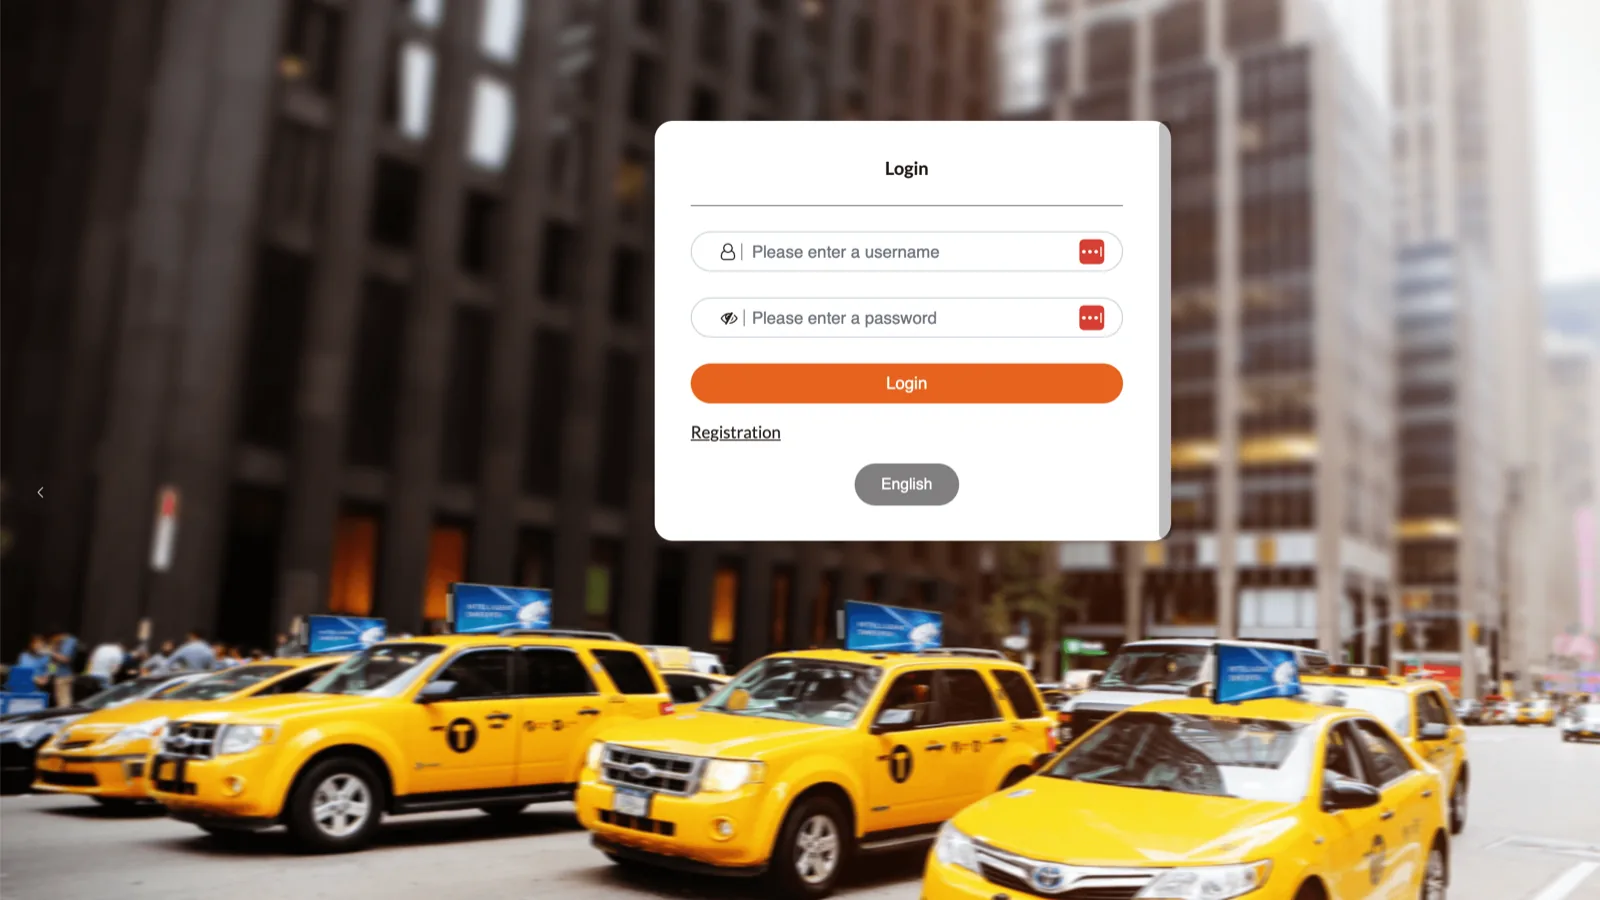
If you cannot remember your password, use the Password Reset link on the login page.
Account menu
Click the account icon in the top right corner. The menu has four items.
- Download vehicle access certificate — downloads your
.icfile, named likeledaips.com--<your-email>.ic. This file binds a controller to your account. - Update Details — shows the platform update notes.
- Modify Login Password — resets your login password. It also lets you change the email address that receives the verification code.
- Logout — signs you out.
.ic file before you go anywhere near the hardware. You select it in LedOK Express to bind a controller to your account — see Device binding.
02Device Binding: Connect a Controller to the Platform
A rooftop screen does not appear in Rooftop Hub until its controller is bound to your account. Binding is done from a PC with LedOK Express.
2.1 What you need before you start
- Get a 4G SIM card in the original size from a local operator. Examples: AT&T, Mint or T-Mobile in the USA; Telstra or Vodafone in Australia; Aircel in India; STC in Saudi Arabia.
- Put the SIM in a phone and activate the data service.
- Ask the operator whether the device IMEI must be registered with the SIM.
- Get the correct APN. If you do not know it, search for it online or call the operator.
Download LedOK Express to the PC before you start.
2.2 IoT SIM whitelist (directional addresses)
Most IoT SIMs need a directional-address whitelist. Give the list below to the operator and ask them to whitelist all of it. The recommended chip is the QFN5 * 6-8 IOT chip. Ordinary commercial SIM cards give a low online rate.
| Domain | IP / NTP |
|---|---|
https://vehub.top | 119.28.100.245 |
china-taxi.oss-cn-hangzhou.aliyuncs.com | ntp1.aliyun.com |
www.yahamcartop.com | — |
www.taxihub.cn | 47.96.237.243 |
www.m2mled.net | 121.201.9.127 |
www.ledaips.com | https://www.hs.8848led.com |
https://www.tlzxled.com | https://www.hs.8848led.com |
www.ledokcloud.com (self-built second-dev platform) | 101.37.118.93 |
2.3 Binding steps
- Power off the LED sign. Insert the 4G SIM, then power the whole device back on. On a Series 3-22 unit, the installation guide shows on video where the SIM slot is.
- Log in at vehhub.top. Click the account icon at the top right and choose Download vehicle access certificate. This saves a
.icfile, for exampleledaips.com--<email>.ic. Keep it on the PC. - Open LedOK Express and detect the LED controller IP (see 2.5 for how to connect). Go to Terminal Control → Advanced, password 888. Set Web Server Address to
https://www.ledaips.com:2340. - Check APK. If the controller still has xixunplayer, uninstall it: Firmware Management, select
com.xixun.xixunplayer, then Uninstall. - Go to Firmware Management, select the taxiapp package file — it downloads under the name VehPlayer, which is the same app. Wait for the message "APK Install Success" - that confirms the upload only. Then click Upgrade, the button just above, which is what actually flashes the app. Open Check APK afterwards and confirm the version changed. If you have not done this before, watch the APK install video.
- Select the controller ID, click Bind ic account, choose the
.icfile you downloaded in step 2, and click OK. - Go to Terminal Control → Network Config. Tick Enable Cellular Data, enter the correct APN, and click Set. You can also select Country ID(mcc) and then the carrier to fill in the APN automatically.
- Click Get cellular network status information to check the signal. "Signal: Not in service area" means the signal is too weak.
- If the signal is weak, move the sign outdoors, near a window, or higher up, until the status improves to Signal: OK and Data connection: Connected.
- Go back to the platform. Open Vehicle Control → Ungrouped. The newly bound controller appears there online. Tick it and click Change Group to assign it to a real group.
2.4 Do not stop at Ungrouped
- A newly bound controller is visible only under Vehicle Control → Ungrouped.
- It counts as 0 on the Home Page until you assign it to a group.
- Vehicles in Ungrouped show the default factory logo and can only serve ads after they are assigned to a group.
2.5 Connecting LedOK Express to the controller
Method A — controller hotspot
FastestThe hotspot name is the card number of the controller (for example y08-623-01280) and the default password is 12345678. Connect the PC Wi-Fi to it.
Method B — network cable
FallbackConnect the PC to the controller LAN port. Turn off the PC firewall and antivirus. In LedOK Express go to Terminals, click detect, confirm, then click Refresh. The controller appears.
Can't find the control card?
- Keep the PC within 1–2 m of the car screen.
- Check for an unknown Ethernet connection, check the cable, and check that the port LED is blinking.
- Make sure power is sufficient and the screen is playing normally.
- Turn the firewall and antivirus off.
2.6 Bind failed?
Open LedOK Express → Terminal Control → Advanced (password 888) and use Check APK. If xixunplayer is present, uninstall it, install the taxiapp package from Firmware Management, then bind the .ic file again.
2.7 SIM card or APN set failed?
Go to Terminal Control → Network Config and click Get cellular network status information. Match what you see:
| What you see | What to do |
|---|---|
| "no checked sim card" | Power the device off, re-insert the SIM, power on again. Not sure where the slot is? See the SIM installation video (Series 3-22). |
| "Lock status, need user's pin code" | Put the SIM in a phone and activate or unlock it first. |
| Wrong or missing Country ID (mcc) | Reset the 4G network. If your mcc is not in the dropdown, type it manually. If the APN is unknown, call the operator. |
| "Signal: Not in service area", signal strength normal | Test with a SIM from a different operator. Swap the SIM with the screen powered off, then bind again. |
| "Signal: Not in service area", signal strength shown as a bunch of numbers | Check and tighten the 4G antenna, and move the display outdoors, near a window, or higher up. |
| Data connection Connected but unstable or dropping | Place the controller outdoors to strengthen the signal. |
| Data active sleep state Active, but nothing sent or received | Make sure the SIM has data and the Ethernet cable is unplugged. |
The hardware side — mounting the sign, running power, placing the antenna — is in the rooftop installation guide.
03Dashboard
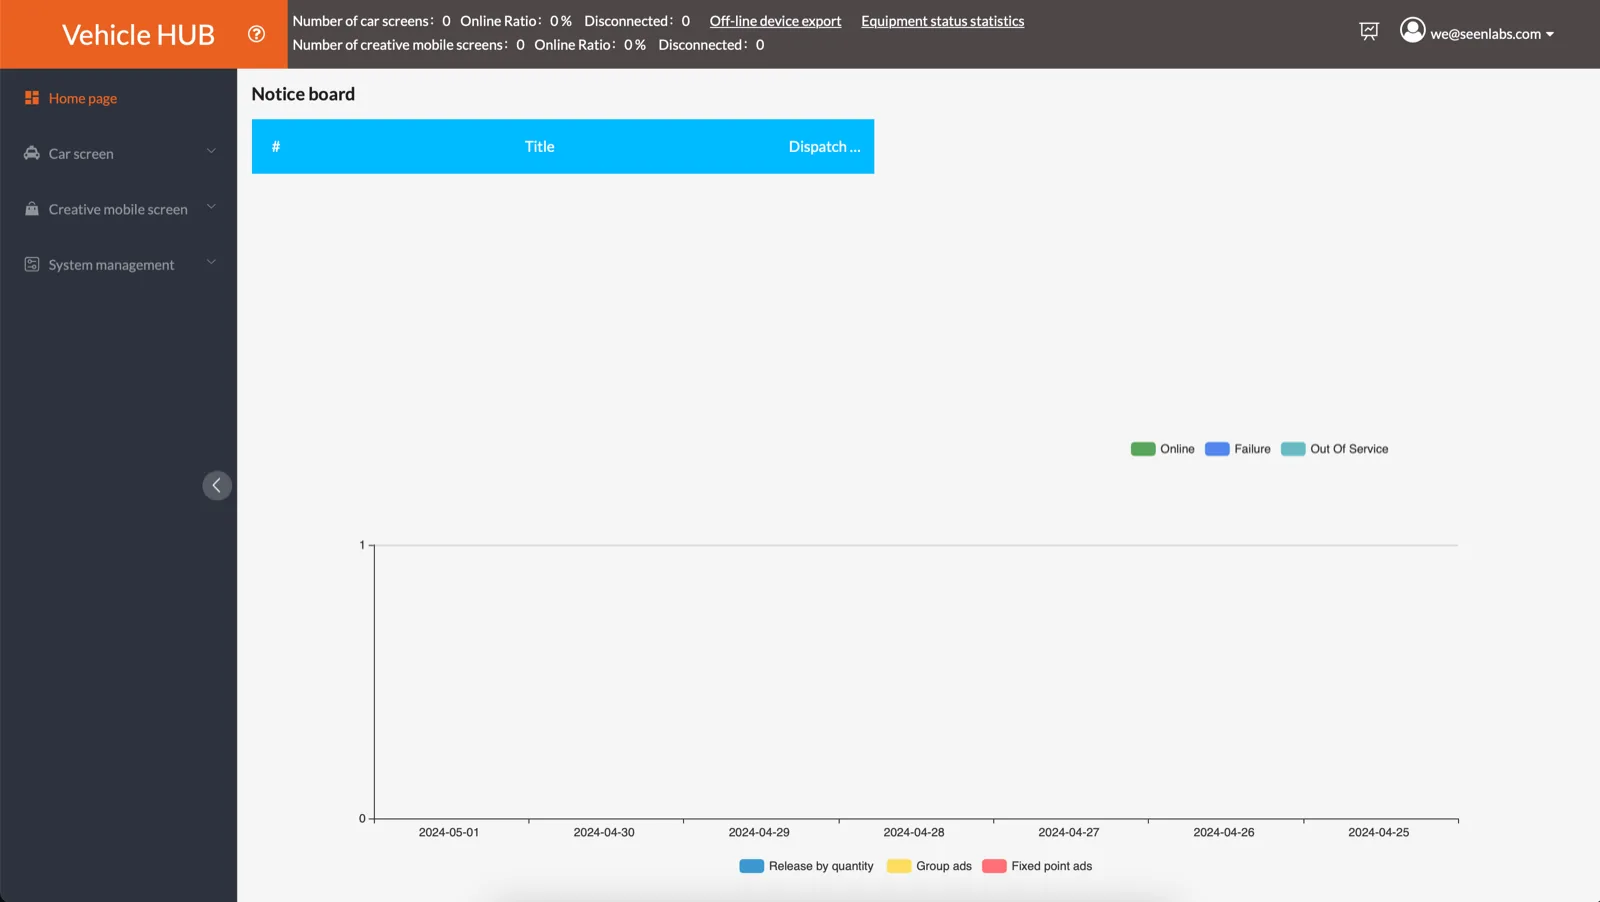
The Home Page has three parts: the equipment statistics bar, the quick navigation bar, and four charts. The account menu sits in the top right corner.
3.1 Equipment statistics bar
Four counters.
| Counter | What it means | Export |
|---|---|---|
| All | Total vehicles. | — |
| Online | Vehicles currently online. | — |
| Offline | No contact for 48 hours. | Click Export for the offline terminal serial IDs and their information. |
| Timeout | No contact for 120 consecutive hours. | Click Export for the terminal serial IDs. |
A newly bound controller is only visible under Vehicle Control → Ungrouped and counts as 0 here until you assign it to a group.
3.2 Quick navigation bar
One-click links to: Map, Vehicle Control, Vehicle group ads, GeoLocation ads, Counting ads, Environmental Monitor.
3.3 Charts
- All vehicle statistics — online, offline, timeout and total counts per day.
- Vehicle run time — total running hours per day.
- Total Ads Statistics — new ads created in the past 7 days.
- Daily Ads Statistics — new ads created today.
3.4 Account menu
The account icon at the top right holds Download vehicle access certificate (the .ic file used to bind a controller), Update Details (platform update notes), Modify Login Password, and Logout.
04Map and Vehicle Tracking
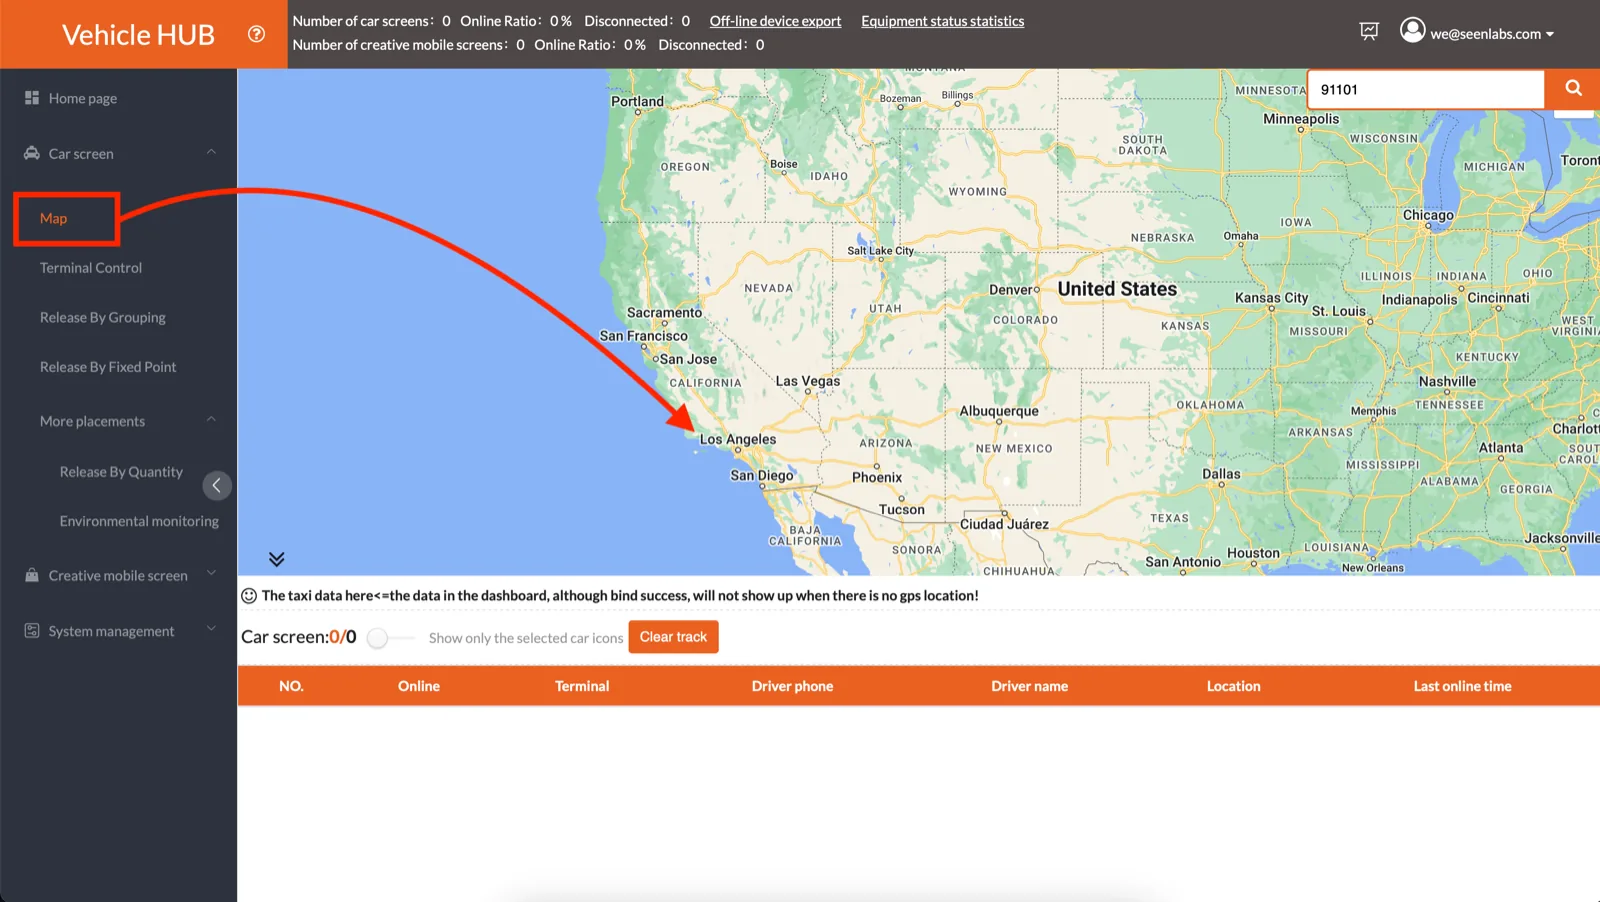
Open Vehicle → Map. The map is a full Google Map.
4.1 Vehicle icons
- Yellow icon — GPS signal is OK.
- Gray icon — GPS signal is lost.
4.2 Vehicle details
Click a vehicle icon to see:
- Vehicle ID
- Driver name and phone
- Location (latitude, longitude)
- Speed
- Last Activity Time
4.3 Mileage and track history
- Query range — pick a date and click Query. The mileage driven that day appears in green text.
- Query track / Display track — pick a date and click Query. The track is drawn on the map.
Both functions support the past 7 days.
4.4 Find one vehicle
Type the License or ID into the search box and click the magnifier to locate that vehicle.
If no vehicles appear on the map, turn on GPS on the devices, refresh the page and clear the cache, and disable any VPN.
05Vehicle Control
Vehicle Control is the main fleet management screen. Open it from Vehicle → Vehicle Control, or from the Quick Navigation bar on the Home Page.
5.1 Groups
- Ungrouped — a newly bound controller lands here. It shows the default factory logo and can only serve ads after you assign it to a group. Until then it counts as 0 on the Home Page.
- + Add New Group (green) — enter a group name, then click Create.
- Each group card shows Online quantity, Wait time per round (s), Vehicle group ads count, and a + Sequence Ads button.
- Multigroup operation (orange) — select one or more groups and run a command against all of their vehicles at once.
- Conditional query — search by Taxi License, Driver Name, Cellphone, Alias or Vehicle ID.
- A reminder banner on this page shows the advertising priority: GeoLocation ads > Sequence ads > Vehicle group ads > Counting ads.
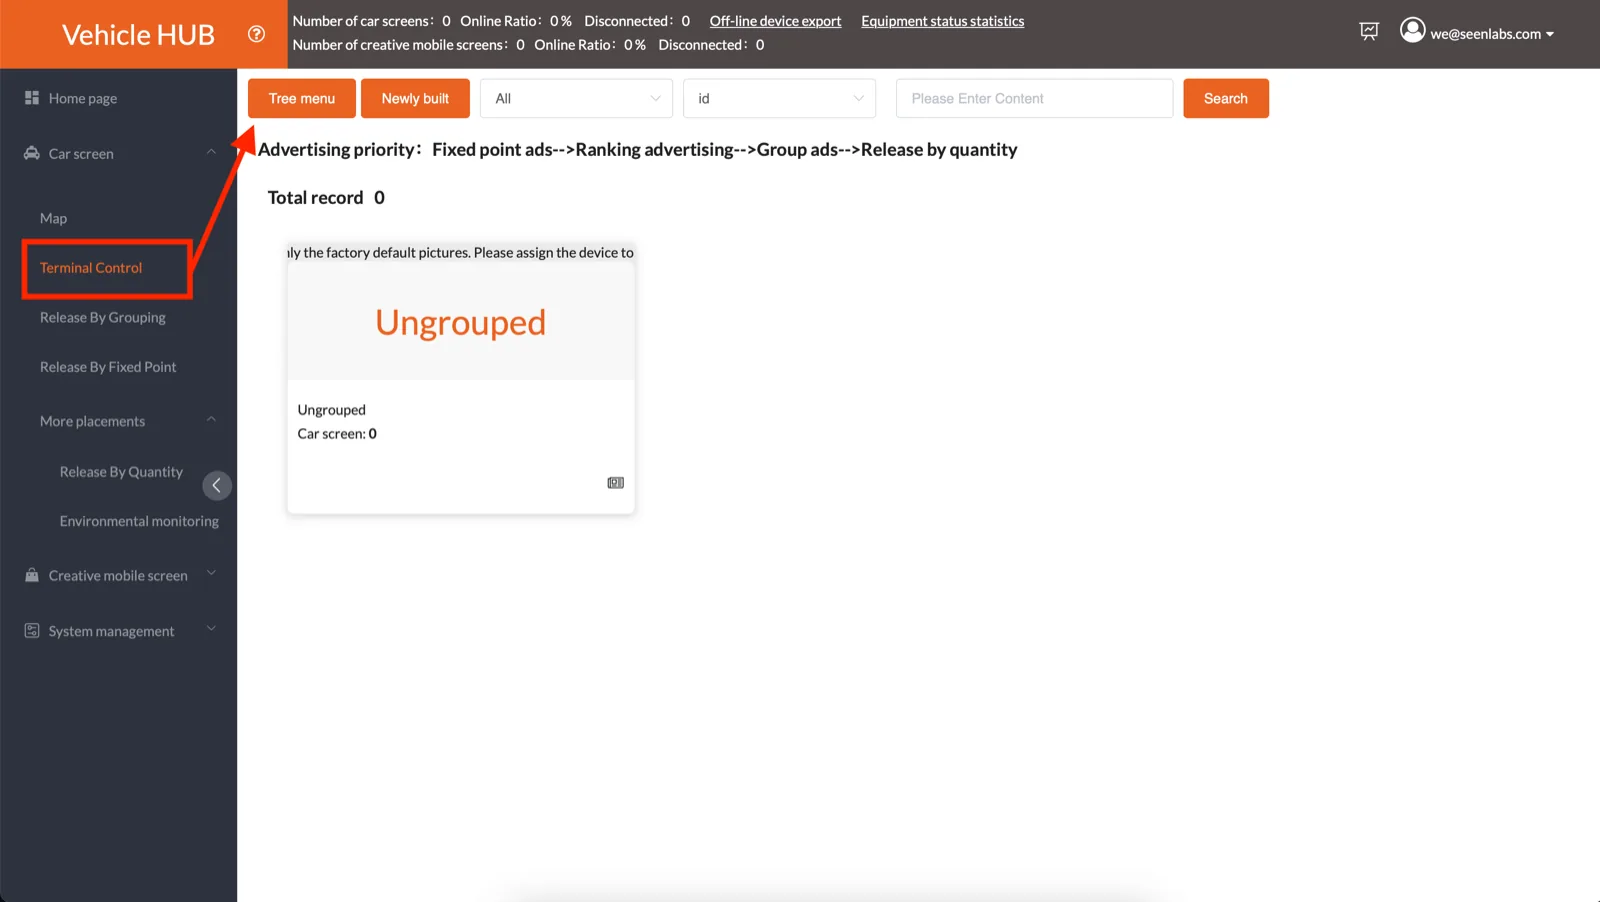
5.2 Per-vehicle function tabs
Tick a vehicle first, then use the tabs.
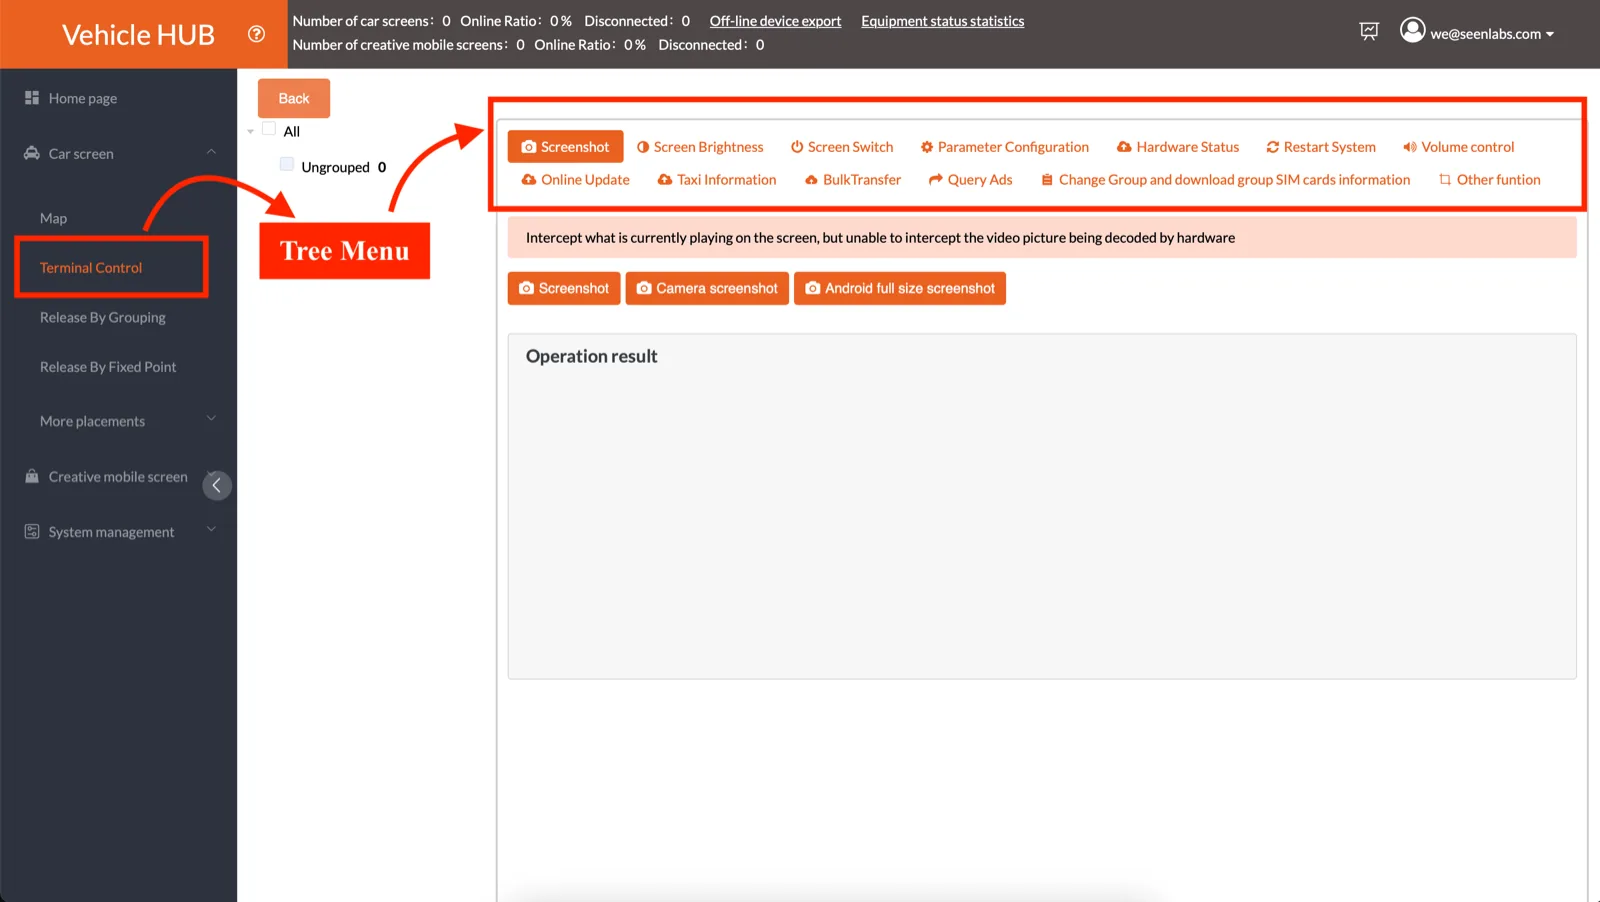
- Taxi Information — edit Taxi License, Driver Name, Cellphone and Alias. Use Download Template and Upload to edit many vehicles in one file.
- Change Group — tick the vehicle, choose the target group, then click Change Group.
- Vehicle Running Log — Query Today's Running Log, Query Past 7 Days Running Log, and Query vehicle mileage. The 7-day log and the mileage query both have Export. Exports contain Device ID, Running Time (h:m:s), Date, Total Running Time and daily mileage in KM.
- Customized LOGO — upload your own logo from the Media Library. It shows on the screen when no ads are playing. Use Set or Clear.
- SIM Information — download SIM data per group: ID, Alias, Licence, Driver, Telphone, SimSerialNumber, SubscriberId, IMEI.
- Realtime Screenshot — Screenshot (the current playing image), Camera screenshot (only if a camera is plugged in), and Android full size screenshot. It cannot capture hardware-decoded video frames.
- Screen Switch — Query reads the vehicle's screen on/off schedule. Manual turns the LED screen On or Off by hand. Schedule adds a schedule task: the screen stays ON during the valid time range and OFF for the rest. It supports Permanent, Specified Date, Specified Time and Specified Week.
- Screen Brightness — Query checks the existing settings. Manual sets a value from 1 (dimmer) to 255 (brighter); a manual value overrides scheduled control until the next scheduled command. Auto Brightness takes a Sensitivity of 1–100 and a Minimum Brightness, where 80 or higher is recommended for night visibility. Uploading a brightness file needs password 888 and the file that matches your sensor type (RL1/RL2, or R6S/R67/RL3). Schedule sets brightness for a valid range plus a Default Brightness for the rest.
- Log Switch — GPS turns the GPS log On or Off. Play Log turns the play log On or Off and sets an upload interval in minutes, where 0 means upload once daily.
- Query Ads — check the Posted List and the Play list (click "See") to double-check the ad play status. "Advertising sort query" checks the sequence ads for that vehicle.
5.3 The "More" menu (password 888)
- Parameter Configuration — Query NTP time (timezone, date, clock), Query GPS (latitude and longitude; no data if there is no GPS), and Query Storage (free space on the controller). Time configuration sets the NTP server address and the time zone (or Customized). To sync all screens to the same frame, set Time Limit to NTP or GPS plus a synchronization interval, then click Set. The factory default is NTP sync mode, which needs the controller to stay online; GPS sync needs a GPS antenna. This tab also holds Backup screen parameter, Recovery screen parameter and Emergency text.
- Hardware Status — Query returns Edition (firmware), Humidity, Temperature, Card Voltage, External Voltage 1 and 2, Door open status and Smog.
- Restart System — restart the controller from the cloud by hand. The default automatic restart is 03:00 AM daily. You can also set and query your own restart schedule.
- Online Update — remote controller firmware update from a .zip package. Upload the APK in advance; Online Update, Uninstall and Update Details are available here.
- Volume Control — query the current volume, set it by hand, or add a schedule task.
5.4 Platform passwords
| Where | Password |
|---|---|
| Vehicle Control → More | 888 |
| Terminal Control → Advanced (LedOK Express) | 888 |
| Brightness file upload | 888 |
| Counting Ads | 8888 |
| Controller Wi-Fi hotspot (default) | 12345678 |
The hotspot name is the controller card number. For functions that are not listed here, email we@seenlabs.com.
06Advertising
Four ad types share one screen. The platform picks between them with a fixed priority order. Check that order before you publish.
| Priority | Ad type | Where to find it |
|---|---|---|
| 1 (highest) | GeoLocation ads | Vehicle → GeoLocation Ads |
| 2 | Sequence ads | Vehicle Control → group card → + Sequence Ads |
| 3 | Vehicle group ads | Vehicle → Vehicle Group Ads |
| 4 (lowest) | Counting ads | Vehicle → More → Counting Ads |
The same rule appears as a reminder banner on the Vehicle Control screen.
6.1 Vehicle Group Ads
Use these to play an ad on whole vehicle groups. These are the ads played in rotation as Sequence Ads. The video walkthroughs cover ad release on screen.
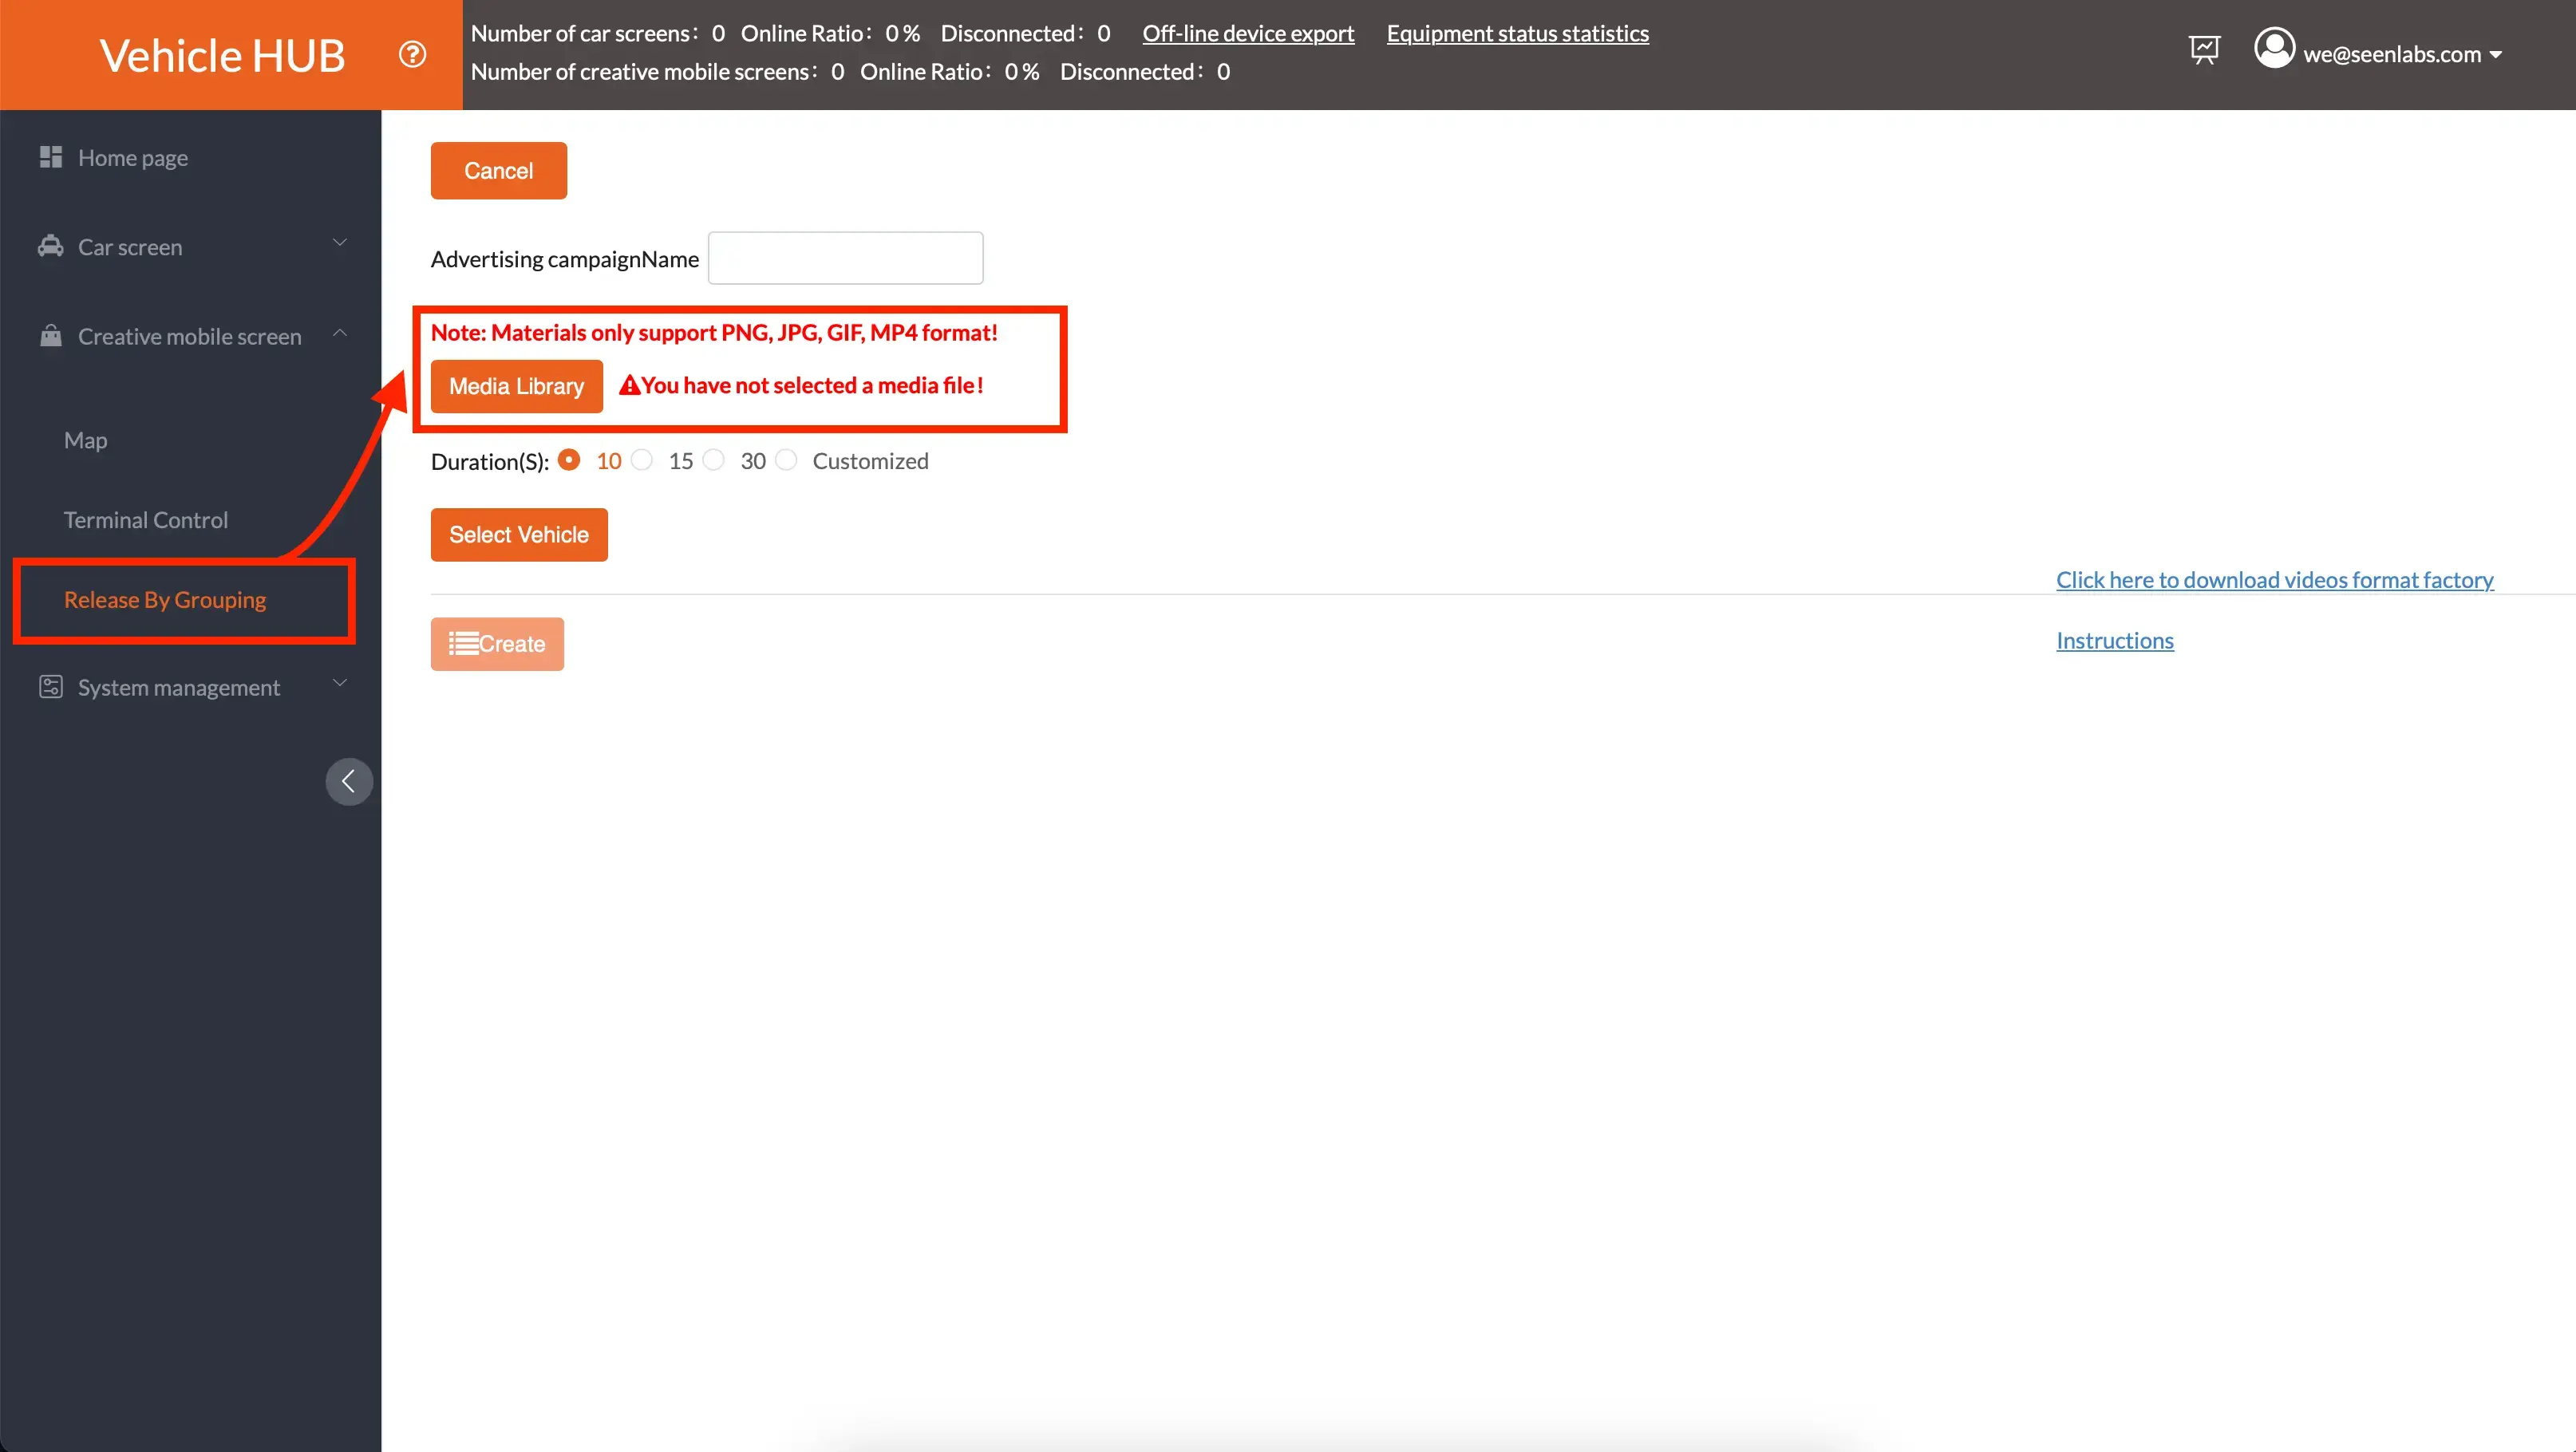
- Go to Vehicle Group Ads and click + Add. Enter the ad name.
- Set Type = Media, open the Media Library and select a file. Use + Add media to upload a new one. A transcode switch is available on upload.
- Set Duration(S): 10, 15, 30 or Customized.
- Open More Property Settings to set Ads Play Times and the Valid Range (specified time plus week days, for example Mon–Sun 00:00:00–23:59:59).
- Click Select Vehicle, pick the group or groups, click OK.
- Click Create. The ad appears under Unreleased with status Pending review, then Approved.
Publish and manage
- Click Publish, then choose Release Now or Set Date for a future release, then OK.
- Use the + button to add the same ad to more vehicle groups.
- Use the Released, Unreleased and Terminated status filters to find an ad by state.
- Details shows Group, Vehicle ID, Execute Success Result and Execute Failed Result. Export release info to Excel (Vehicle ID, Alias, License, Driver Name, Driver Tel, Execute Time).
6.2 GeoLocation Ads
These play only when a vehicle is inside a defined area — a fixed point plus a radius. Highest ad priority.
- Open GeoLocation Ads. On the map, click + fixed point. A red icon drops on the map.
- Click Edit on the point. Enter a Name and a Radius (meter), then Confirm. You get "Create Success". Each point shows its Longitude and Latitude.
- Click + Geolocation ads. Enter the Ad Name, pick the Media from the Media Library or upload one, and set Play time(S) (10, 15, 30 or Customized). A customized play time cannot exceed the video default duration.
- Select date for the start and end, with a valid range of 00:00:00–23:59:59.
- Select Fixed Point from the point list, click Next.
- Select Vehicle (terminal group), then Create.
- Click Execute. You get "Create GeoLocation ads success, waiting for approval and release". Execute again to publish.
The List button switches between the map view of fixed points and the list view.
6.3 Counting Ads
Enter Counting Ads with password 8888. They are used mainly to replenish an ad a set number of times. Lowest ad priority.
- Click + Add New.
- Enter the Ad Name.
- Set Vehicle No — how many vehicles to display on, for example 50 of 100.
- Pick the Media from the media center and set Duration(S), the play duration of each media.
- Tick Online Priority if the counting ad should be released ahead of sequence ads. Leave it clear for normal order.
- Click Create, examine the entry, then Publish with Release Now or a set date and time.
The Released filter shows live ads. The stop button opens Terminate with three options: Stop, Delay Offline and Cancel The Offline. Terminated ads move to the Terminated filter and can be deleted.
6.4 Supported media formats
| Item | Rule |
|---|---|
| Supported formats | PNG, JPG, GIF and MP4 |
| Video formats | 3GP or MP4 only |
| MP4 encoding | Divx, Xvid or AVC/H.264 |
| Recommended ratio | 320p to 720p |
| Resolution | Video larger than 1280 or larger than 1080 may cause playback errors |
| Color mode | RGB. CMYK shows a black screen |
Other encodings may fail to play, so convert the file first. See the video format conversion guide. If a picture shows as a black screen, re-export it as RGB.
07Play Logs and Reports
Play logs record what played, where and for how long.
7.1 Turn the log on first
A vehicle only reports playback when its Play Log switch is on. If you cannot query the play log after publishing, check the switch before anything else. Go to Vehicle Control, select the grouping, open Log Switch, then the Play Log tab, and turn it ON. You can also set the upload interval in minutes; 0 means upload once daily. Behaviour varies by device software version.
7.2 Play Log in the platform
- Open Vehicle Group Ads and click Play Log.
- Choose the view: Charts, List or Map.
- Set the date range, for example the past 7 days.
The view shows Vehicles, Impressions and Duration. Each record shows Start Time, Card Number, Alias, Name, Duration and the Start Playing Longitude and Latitude. Click Export for an Excel file with Device Id, Alias, Duration, Begin Play Time, AD Name, Latitude and Longitude.
7.3 Detailed report by email
For full per-play records, use the emailed report. It is not instant.
- Log in and open Vehicle Group Ads → Play Log.
- Click Export play log details.
- A tip says the report is emailed to the current user in 1–2 business days. Click OK.
- A second tip says "Export Success, pay attention to your mailbox". Click OK.
- Check the email of the account you are logged in with. The message contains Ad ID, Time Range, Total Records, Device Count, File Size and a download link to an .xlsx file.
The workbook has two sheets, Statistics and Details. The Details sheet lists Device Id, Start Place, Duration, Latitude, Longitude and Record Time.
08User Management and Operation Log
Both screens are under System Management in the left menu.
8.1 Permissions are groups, not roles
Rooftop Hub has no fixed job titles. You build a permission group by ticking boxes in a permission tree, then you put users into that group. Two groups can have any mix of permissions you want.
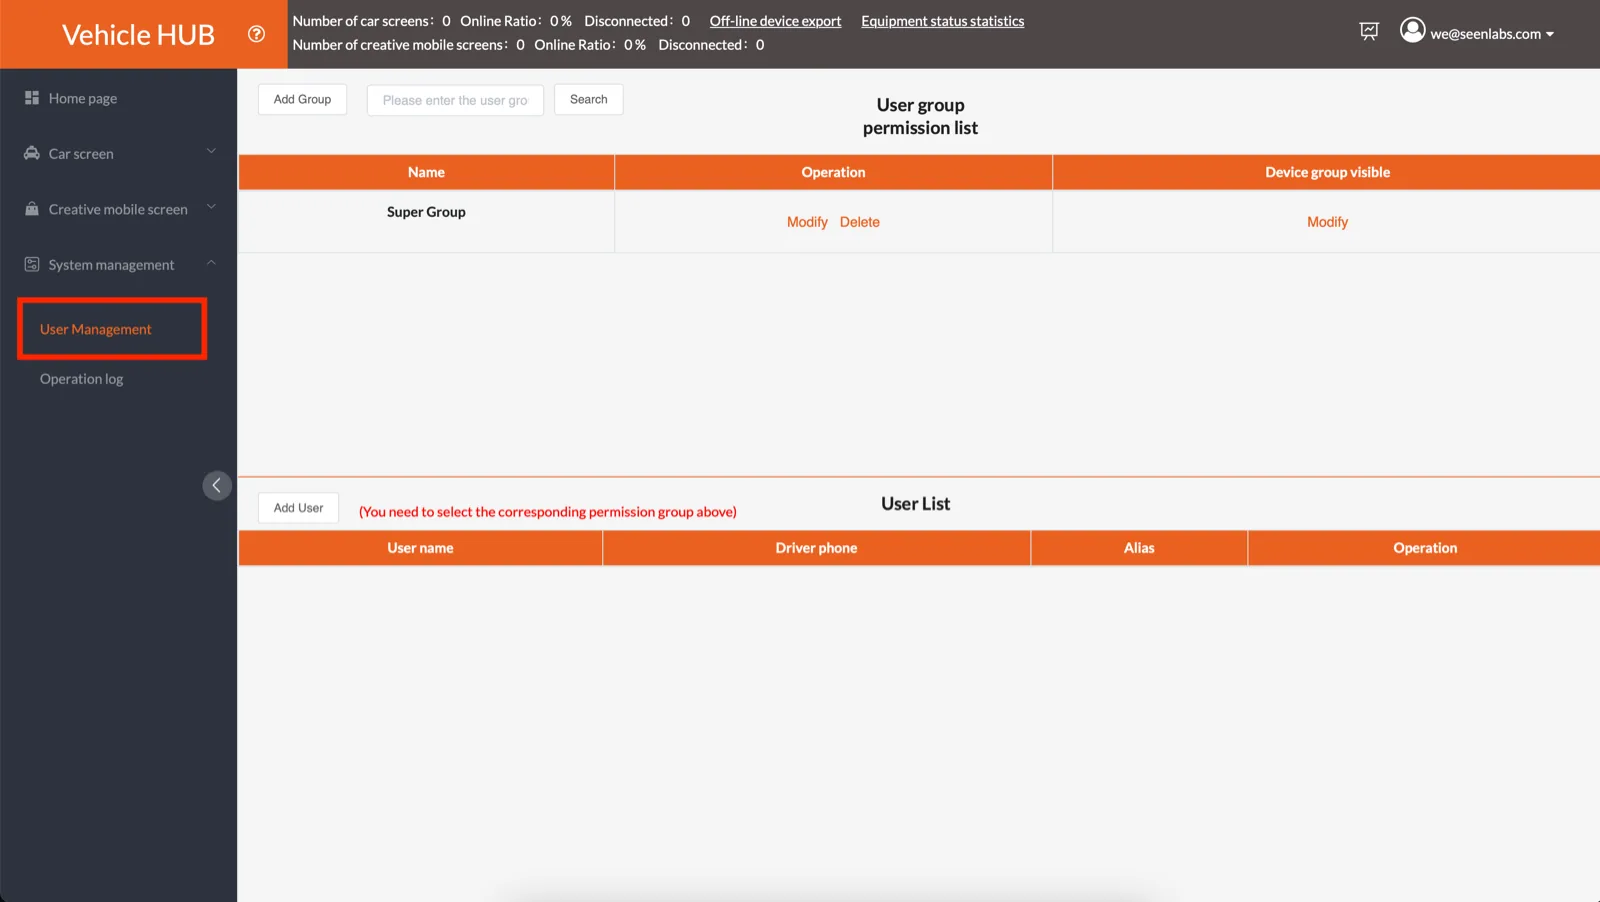
8.2 Add Group
- Go to System Management → User Management.
- Click Add Group and enter a group name.
- Tick the permissions this group needs from the tree. Car mounted screen covers Vehicle group ads, Map, Media management (with separate sub-permissions for Upload media files and Delete media files), GeoLocation ads, Release by counting ads, Device management and Environmental detection. Creative mobile screen has its own sub-permissions.
- Click Add.
- Select the new group and click Modify. Here you choose which vehicle groups this user group can see. Pick Select All or specific groups, then Confirm.
8.3 Add User
There is no email invitation and no invite link. You create the account yourself and hand the login details to the person.
- Select the permission group the user belongs to.
- Click Add User at the bottom.
- Enter the username (the login account, minimum 8 characters) and a password (minimum 8 characters).
- Mobile phone and alias are optional.
- Click Add. You see "Successfully Added".
The User List shows User name, Driver phone, Alias and Operation. Groups and users can be modified or deleted from the same screen.
8.4 Operation Log
Go to System Management → Operation Log. It has four tabs:
- taxiapp Operation log — device and ad actions. Each row shows NO., Event Type, Note Information, IP and Operation Date. Event types include addUser, addUserGroup, offlineCountAd, placeCountAd, addCountAd, placeRegionAd, deleteRegionAd, addRegionAd, addRegion and deleteRegion.
- conn Operation log — present in the platform, with no documented contents.
- Backpack monitor Operation log — present in the platform, with no documented contents.
- User log — present in the platform, with no documented contents.
Frequently Asked Questions
How do I register for a Rooftop Hub account?
Registration is self-service and immediate. There is no approval step. Open vehhub.top in Google Chrome, click Create an Account, enter a valid email, set and confirm a password, and accept the user agreement. To log in you pass the captcha, click Get verification code, and enter the code sent to your email.
What do I need to connect a new LED controller?
Four things: a 4G SIM card that is activated for data and set to the correct APN from your carrier, a PC running LedOK Express, your .ic vehicle access certificate (account menu, Download vehicle access certificate), and the taxiapp package installed on the controller through Firmware Management. If xixunplayer is still installed, uninstall it first.
Why is my new controller not showing up, or showing under Ungrouped?
A newly bound controller appears only under Vehicle Control → Ungrouped, and it counts as 0 on the Home Page until you group it. Ungrouped vehicles show the default factory logo and cannot serve ads. Tick the vehicle and click Change Group. If it does not appear at all, check the SIM, the APN and the signal, and confirm the .ic file was bound.
What video and image formats are supported?
Images: PNG, JPG and GIF. Video: 3GP or MP4 only, encoded with Divx, Xvid or AVC/H.264. Other encodings may fail to play, so convert them first. Use a common ratio between 320p and 720p; video larger than 1280 or larger than 1080 may cause playback errors. Pictures must be in RGB color mode, because CMYK shows a black screen.
Which ad plays first when several are scheduled on the same vehicle?
Priority runs highest to lowest: GeoLocation ads, then Sequence ads, then Vehicle group ads, then Counting ads. So an ad tied to a fixed point plays while the vehicle is inside that point's radius. One exception: a Counting ad created with Online Priority ticked is released ahead of sequence ads.
When is a vehicle marked Offline versus Timeout?
Offline means the platform has had no contact with the vehicle for 48 hours. Timeout means no contact for 120 consecutive hours. Both counts appear in the Home Page status bar, and each has an Export button that downloads the terminal serial IDs and details of the affected vehicles.
How do I add a team member?
There is no invitation email. Go to System Management → User Management, click Add Group, name the permission group and tick the permissions it needs, then use Modify to choose which vehicle groups it can see. Select that group, click Add User, and create a username and password (both minimum 8 characters). Give those credentials to the person directly.
Why is my play log empty?
A vehicle only reports playback when its Play Log switch is on. If the log is empty after publishing an ad, go to Vehicle Control, select the group, open Log Switch → Play Log, turn it on, and set the upload interval in minutes (0 means the device uploads once a day). Then check the log again.
How do I get a detailed play report?
Open Vehicle Group Ads → Play Log and click Export play log details. The report is not instant: it is emailed to the current user in 1–2 business days. The email lists Ad ID, time range, total records, device count and file size, plus a download link to an .xlsx file with Statistics and Details sheets.
What are the platform passwords?
Three fixed passwords are used. 888 opens the More menu in Vehicle Control, Terminal Control Advanced in LedOK Express, and brightness file upload. 8888 opens Counting Ads. 12345678 is the default Wi-Fi password of the controller hotspot, whose network name is the controller card number.
Troubleshooting
Start with the symptom you can see on the screen or in the platform.
Binding the controller failed
Open LedOK Express and go to Terminal Control → Advanced (password 888). Click Check APK.
- If
com.xixun.xixunplayeris installed, go to Firmware Management, select it and click Uninstall. - In Firmware Management, select the taxiapp package. Wait for "APK Install Success", then click Upgrade to flash it, then re-open Check APK to confirm the version changed. There is a reference video for installing the package.
- Bind the
.iccertificate file again with Bind ic account.
Also confirm the Web Server Address is set to https://www.ledaips.com:2340.
LedOK Express cannot find the controller
- Keep the PC within 1–2 m of the car screen.
- Check the Ethernet cable and the port LED. The LED should blink.
- Make sure the screen has enough power and is playing normally.
- Turn off the PC firewall and antivirus.
- Connect over the controller Wi-Fi hotspot (hotspot name = card number, password
12345678) or with a network cable, then use detect and Refresh in Terminals.
SIM card or APN problems
Go to Terminal Control → Network Config and click Get cellular network status information. The message-by-message fixes are in the table in section 2.7. The correct state is Signal: OK, Data connection status: Connected, and a signal strength that is a real reading.
Vehicle shows offline but is running
- Check that the device has working internet, over Wi-Fi or cellular data.
- Restart the LED player and wait 2–3 minutes.
- Confirm the controller is bound to your account and assigned to a group. A bound but ungrouped controller only shows under Vehicle Control → Ungrouped and counts as 0 on the Home Page.
A vehicle is shown as Offline after 48 hours with no contact, and as Timeout after 120 consecutive hours with no contact.
Ad stays pending
Usual causes: the vehicle is offline, the signal is weak, or the media file is in a format or size the player cannot handle. Wait until the vehicle is in a strong signal area, or bring the file back inside the media rules in section 6.4 and release it again.
Uploaded video will not play
- Video files must be 3GP or MP4. For MP4, use Divx, Xvid or AVC/H.264 encoding. Other encodings may fail to play, so convert the file first.
- Video larger than 1280 or larger than 1080 may cause playback errors. The recommended range is 320p to 720p.
- Pictures must be RGB. A CMYK image shows a black screen, so re-export it as RGB.
See the video format conversion guide for the exact export settings.
No vehicles on the map
- Enable GPS on the devices. A yellow vehicle icon means the GPS signal is OK, a gray icon means GPS is lost.
- Check the GPS log switch: Vehicle Control → Log Switch → GPS, with the group selected.
- Turn off your VPN, because some VPNs block map services.
- Refresh the page and clear the browser cache.
Scheduled content does not play at the right time
- Check the NTP server address and the time zone: Vehicle Control → More (password
888), then Parameter Configuration, then Time configuration. Use Query NTP time to see the time the controller is using. - Check whether a higher-priority ad type is overriding it. The order is GeoLocation ads, then Sequence ads, then Vehicle group ads, then Counting ads.
- Confirm the valid range and week days set on the ad have not expired.
Prefer not to run the platform yourself?
Stuck? We'll sort it out.
Email us the vehicle ID and a screenshot of what the platform is showing — it is usually all we need to diagnose the issue on the first reply.
If a setup ever needs hands-on help, we can go through LedOK Express with you on your own computer using UltraViewer. Rarely needed - noted here only so you know the option exists.