01What the Screen Accepts
These rules come from the controller manual. A file that breaks any one of them can upload fine and still show nothing on the road.
| Setting | Rule |
|---|---|
| Video container | MP4 or 3GP. Nothing else. |
| Video encoding | AVC / H.264, Divx, or Xvid. Other encodings may fail to play. |
| Video size | Match the screen's own pixel size. Anything wider than 1280 or taller than 1080 may cause playback errors. |
| Working range | 320p to 720p is the recommended range. |
| Image files | PNG, JPG, or GIF. |
| Image colour mode | RGB. A CMYK image shows a black screen. |
.mov from a camera or an editing suite, it has to be converted before it goes anywhere near the platform. The same goes for anything exported "for YouTube" — that is almost always 1920×1080, which is above the limit.
Why 1920×1080 is the wrong target
A rooftop panel is typically a few hundred pixels across — for example 320×160 or 416×320. Feeding it a 1920×1080 file makes the controller decode and scale down many times more pixels than it will ever display. That is where dropped frames, stutter and outright playback failures come from. Encode at the size the screen actually is, and the same clip plays smoothly on a fraction of the file size.
The full media rules as they appear in the platform, together with how the media library and ad types work, are in the Rooftop CMS Manual.
02Find Your Screen's Pixel Size
Everything below depends on this one number pair. Get it before you open any converter.
- Sign in to the platform at vehhub.top.
- Go to Vehicle → Vehicle Control and open the group the vehicle belongs to.
- Find the terminal in the list. The screen resolution is shown with the terminal's details — write down the width and the height.
If the list does not show it, measure it from the hardware: modules multiplied by module resolution. A panel built from four 160×160 modules in a row is 640×160. When you genuinely cannot tell, email we@seenlabs.com with the vehicle ID and we will look it up.
03Convert on Windows with Format Factory
Format Factory is free, runs offline, and gives you direct control over the encoder and the output size. That control is the reason we use it.
Format Factory
Recommended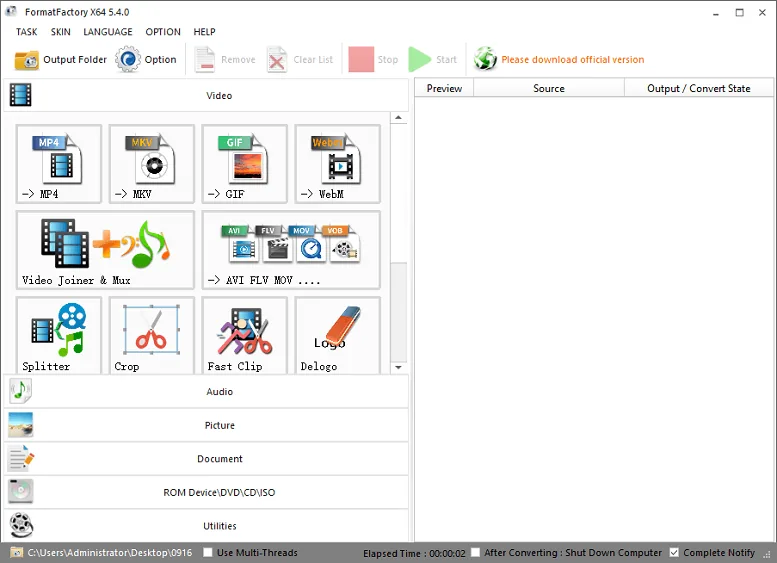
- Open Format Factory and choose Video → MP4 in the left column.
- Click Add File and pick the clip you want to convert. You can add several at once — they all get the same settings.
- Click Output Setting to open the profile editor. This is the part that matters.
- Set Video Encode to AVC (H264). Do not leave it on HEVC or on an automatic setting.
- Set Video Size to your screen's pixel size. If the exact size is not in the dropdown, type it — for example
640 x 160. Never go above 1280 wide or 1080 tall. - Set Aspect Ratio to Auto only if the source already matches the panel shape. Otherwise crop the source first, or the picture will be squeezed.
- Leave Video Bitrate around 1000–2000 kbps for a panel this size. Higher just makes the file bigger without anything visible on the LEDs.
- Set Audio Stream to AAC, or disable audio entirely if the vehicle has no speakers.
- Click OK, then Start. The output folder is shown at the top of the window.
A working profile, in short
| Field | Value |
|---|---|
| Container | MP4 |
| Video Encode | AVC (H264) |
| Video Size | Exactly your panel, e.g. 640 × 160 |
| Video Bitrate | 1000–2000 kbps |
| Frame Rate | 25 or 30, fixed |
| Audio | AAC, or off |
04Mac and Linux
Format Factory does not run on macOS or Linux. Two alternatives produce the same result.
HandBrake — macOS, Windows, Linux
Graphical- Open your file, then set Format to MP4 on the Summary tab.
- On the Dimensions tab, set Resolution Limit to Custom and enter your panel's width and height.
- On the Video tab, set Video Encoder to H.264 (x264) and Framerate to 25 or 30 with Constant Framerate.
- Choose Avg Bitrate and enter 1500 kbps.
- Set the destination and click Start.
FFmpeg — any platform
Command lineReplace 640:160 with your panel's size:
ffmpeg -i input.mov -c:v libx264 -profile:v baseline -pix_fmt yuv420p \
  -vf "scale=640:160" -r 30 -b:v 1500k -c:a aac -b:a 96k output.mp4
To letterbox instead of stretching a 16:9 source into a wide panel, swap the filter for this one:
-vf "scale=640:160:force_original_aspect_ratio=decrease,pad=640:160:(ow-iw)/2:(oh-ih)/2"-profile:v baseline and -pix_fmt yuv420p are there on purpose — they keep the stream within what the controller's decoder handles.
05Upload and Check It
Converting is half the job. Confirm the file plays before it goes out on a vehicle.
- Play the converted file locally first. If it will not play on your own computer, it will not play on the screen.
- Sign in at vehhub.top and open the media library from Vehicle Group Ads → + Add → Media Library.
- Upload the file and wait for it to finish processing.
- Build the ad, publish it to one test vehicle, and wait for the vehicle to pick it up.
- Use Vehicle Control → Realtime Screenshot to see what the panel is showing.
Full ad creation, scheduling and play-log steps are in the Rooftop CMS Manual. If you would rather watch it done, the same workflow is on Rooftop CMS Videos.
Troubleshooting
The failures that account for nearly every support ticket about content.
| Symptom | Cause and fix |
|---|---|
| File uploads, screen stays black | Either the video is not H.264 in an MP4, or a still image was saved as CMYK. Re-encode the video as AVC / H.264, and re-export images from Photoshop as RGB. |
| Video stutters or freezes part-way | The file is too large in pixels. Anything above 1280 wide or 1080 tall may fail. Re-encode at the panel's own size. |
| Picture looks stretched or squashed | A 16:9 source was forced into a wide panel. Crop the source to the panel's shape, or letterbox it with padding. |
| "Conversion failed" in the converter | The source file is corrupt or uses an encoding the tool cannot read. Open it in VLC first. If VLC cannot play it either, ask for a fresh export of the original. |
| Ad sits at Pending and never plays | Usually the vehicle, not the file: it is offline or on a weak cellular signal. A smaller file also reaches the vehicle faster over 4G, so trimming the bitrate helps here too. |
| Sound and picture drift apart | Variable frame rate in the source. Re-encode with a fixed frame rate of 25 or 30. |
Questions We Get
Can I just upload the file my agency sent?
Only if it is already an MP4 encoded with H.264 and no larger than the panel. Agency masters are almost never either of those things, so plan on one conversion pass.
Is there a maximum file size?
The controller manual does not state a hard limit. In practice the constraint is the cellular link: every megabyte has to reach the vehicle over 4G, so a lean file is deployed and playing sooner. If you have followed the sizes above, files land in the low single-digit megabytes anyway.
Can I convert a batch at once?
Yes. Format Factory, HandBrake and FFmpeg all accept a queue. Set the profile once and run the whole set. If your fleet has more than one panel size, run one batch per size.
Will converting hurt the quality?
Not in any way you will see. An LED panel a few hundred pixels across cannot show the detail a 1080p master carries. Encoding to the panel size discards data the screen was never going to display.
What about GIFs and still images?
PNG, JPG and GIF all work directly, no conversion needed — as long as they are RGB and sized to the panel. A still image often reads better at highway speed than a busy video.
Do I have to do this myself?
No. Content preparation, scheduling and reporting are part of our managed service. You send the creative, we handle the rest. Details on the hardware are on the rooftop LED product page.
Stuck? We'll sort it out.
Send us the original file and the vehicle ID. We'll convert it correctly, send it back, and tell you which setting was wrong so the next one works first time.